jinvasshole
- 浏览: 769908 次
-

文章分类
最新评论
-
finaljava:
编译时 如何设置配置文件 使speex开启回音处理功能?
Speex manul中文版 -
tenwx1:
正好想找这方面的资料,楼主真细心
解决线程中的非模式对话框
Three20软件引擎之构建开发环境与第一个项目HelloWorld
Three20软件引擎之构建开发环境与HelloWorld
亲爱的朋友们,如果你现在在做IOS
软件开发,不妨来看看Three20这套框架。如果你对它还比较陌生?MOMO在这里告诉你它绝对是一个IOS 软件开发的利器,有了它绝对让你的软件事半功倍。three20框架的前身是facebook iPhone 客户端。 后来facebook将其开源了,就有了three20这个框架。据说开发这套引擎的这个程序大牛 facebook为了挖他直接把他所在的公司买下来了,我心里就琢磨这人也太牛了吧。做了一个客户端 开源后直接就变成流行引擎了。真的是让我辈望尘莫及啊~~ 哈哈 废话不多说了我们进入正题。
在Xcode4上构建three20框架
首先进入Three20官网去下载最新版本
进入官网后,如下图所示点击Download下载最新版本,目前最新版本为1.0.6.2。

下载完毕后解压缩,由于Three20目前别说国内的资料少了,国外的资料都不多。不过开发包中附带了几个Demo,MOMO
先在这里赞一下!这两天我就是靠这几个Demo来学习的。Demo的路径在下载包samples 文件夹中,一共9个Demo,建议想用Three20框架开发的盆友们 一定要好好读一读这几个Demo,比去网上找资料强多了!
大家看看官网的说明,
如何在Xcode4上添加Three20框架。我懒得翻译了~~
Xcode 4 Transition Guide
Apple is aiming for Xcode 4 to be the primary iOS development environment and, as a result, many will need to transition from Xcode 3.2 to Xcode 4. This guide has been put together in order to help you migrate your apps to Xcode 4 successfully.
What you need to do
For existing projects
If you want to start using Xcode 4 with an existing project made using Xcode 3.2.#, all you need to do to update your project is run ttmodule again like so:
重点在这里,先创建好一个普通的IOS
工程,打开mac电脑的终端去执行下面这段python 脚本
three20/sre/scripts/ttmodule.py
: 须要执行的脚本文件
path/to/your/project.xcodeproj
: IOS 工程路径
这里强调一下,不要使用cd
到scripts路径下在去执行这段脚本,因为这样的话有时候会提示无效的命令,所以大家还是老老实实去输入自己的完整路径吧。
- >pythonthree20/src/scripts/ttmodule.py-ppath/to/your/project/project.xcodeprojThree20--xcode-version=4
python脚本执行完毕后,就应该环境就搭建完毕了
,快快打开工程检查一下,如下图所示,安装成功后打开工程后在Frameworks中会出现很多Three20的相关的东西。 如果到这一步还是没有出现这些Frameworks文件,那么请仔细阅读上面的博文检查一下自己的步骤。

到这一步就彻底安装成功了,下面开始构建我们第一个项目HelloWorld。
- #import<UIKit/UIKit.h>
- intmain(intargc,char*argv[])
- {
- NSAutoreleasePool*pool=[[NSAutoreleasePoolalloc]init];
- intretVal=UIApplicationMain(argc,argv,nil,@"Three20AppDelegate");
- [poolrelease];
- returnretVal;
- }
学过IOS开发的朋友绝对不会陌生,在项目中须要使用Three20库的时候须要import一下~
#import<Three20/Three20.h>
URL
简直就是three20 亮点中的亮点,实在是太好用了。有可能是因为facebook是互联网公司的原因吧,他们的引擎的原理都很像www.xx.com 这种网址的结构,因为手机不像PC 不可能同时显示多个页面,那么用URL这种方式去切换界面实在是太给力了~会省下很多逻辑判断切换界面的代码,直接去维护这个URL 就可以,由于本章主要是构建Three20框架,所以MOMO在这里只带大家学习入门的知识, 后期我肯定会详细的介绍TTURLMap 这个类,因为它实在是太好用了,哇咔咔.
举个例子
tt://Myview/1
tt://Myview/2
上面是两个软件界面,实现界面的切换的方法就好比我们在浏览器中输入网址一样,输入网址1
就进1 输入网址2 就进 2,一切事件的处理three20 都帮我们做了。
- #import"Three20AppDelegate.h"
- #import"MyViewController.h"
- @implementationThree20AppDelegate
- -(BOOL)application:(UIApplication*)applicationdidFinishLaunchingWithOptions:(NSDictionary*)launchOptions
- {
- //创建导航条
- TTNavigator*navigator=[TTNavigatornavigator];
- navigator.persistenceMode=TTNavigatorPersistenceModeAll;
- navigator.window=[[[UIWindowalloc]initWithFrame:TTScreenBounds()]autorelease];
- //TTURLMap非常重要的一个属性
- //界面的点击切换完全取决与它的设定
- TTURLMap*map=navigator.URLMap;
- //如果须要访问wab页面的话就必需添加
- [mapfrom:@"*"toViewController:[TTWebControllerclass]];
- //拼一个url意思是如果访问"tt://MyView"会进入MyViewControllerclass
- [mapfrom:@"tt://MyView"toSharedViewController:[MyViewControllerclass]];
- if(![navigatorrestoreViewControllers]){
- //打开上面设置的url
- [navigatoropenURLAction:[TTURLActionactionWithURLPath:@"tt://MyView"]];
- }
- returnYES;
- }
- -(void)dealloc
- {
- [superdealloc];
- }
- @end
由于在程序入口中就将URL
指向这里 ,所以在这里添加显示view等等。
- #import"MyViewController.h"
- #import<Three20Style/UIColorAdditions.h>
- @implementationMyViewController
- -(void)loadView{
- [superloadView];
- //创建一个可滑动的view
- UIScrollView*scrollView=[[[UIScrollViewalloc]initWithFrame:TTNavigationFrame()]autorelease];
- scrollView.autoresizesSubviews=YES;
- scrollView.autoresizingMask=UIViewAutoresizingFlexibleWidth|UIViewAutoresizingFlexibleHeight;
- //背景颜色
- scrollView.backgroundColor=[UIColorwhiteColor];
- self.view=scrollView;
- //标题内容
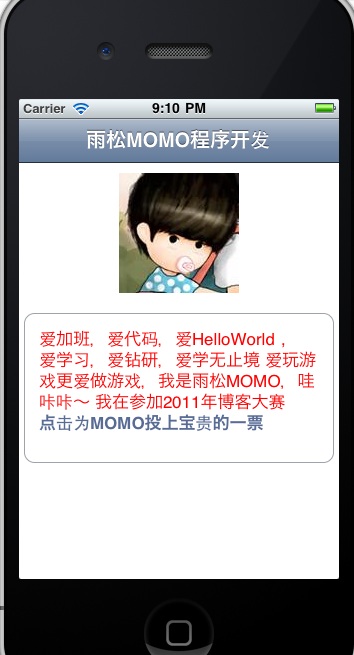
- self.title=@"雨松MOMO程序开发";
- //设置雨松MOMO头像图片
- CGRectframe=CGRectMake(100,10,120,120);
- TTImageView*imageView=[[TTImageViewalloc]initWithFrame:frame];
- UIImage*image=[UIImageimageNamed:@"1.jpg"];
- imageView.defaultImage=image;
- [scrollViewaddSubview:imageView];
- //view风格边框颜色
- UIColor*black=RGBCOLOR(158,163,172);
- //view风格
- TTStyle*style=[TTShapeStylestyleWithShape:[TTRoundedRectangleShapeshapeWithRadius:10]next:
- [TTSolidFillStylestyleWithColor:[UIColorwhiteColor]next:
- [TTSolidBorderStylestyleWithColor:blackwidth:1next:nil]]];
- frame=CGRectMake(5,150,310,150);
- //新建一个TTView将设置的风格赋值给它
- TTView*view=[[[TTViewalloc]initWithFrame:frame]autorelease];
- //背景颜色
- view.backgroundColor=[UIColorwhiteColor];
- //赋值风格
- view.style=style;
- //显示字符串支持html语言
- NSString*text=@"爱加班,爱代码,爱HelloWorld,爱学习,爱钻研,爱学无止境爱玩游戏更爱做游戏,我是雨松MOMO,哇咔咔~我在参加2011年博客大赛<ahref=\"http://blog.51cto.com/contest2011/3361352\">点击为MOMO投上宝贵的一票</a>";
- frame=CGRectMake(10,10,290,150);
- //TTStyledTextLabel很给力啊这个哈哈!
- TTStyledTextLabel*label=[[[TTStyledTextLabelalloc]initWithFrame:frame]autorelease];
- label.font=[UIFontsystemFontOfSize:17];
- label.textColor=[UIColorredColor];
- label.text=[TTStyledTexttextFromXHTML:textlineBreaks:YESURLs:YES];
- label.contentInset=UIEdgeInsetsMake(5,5,5,5);
- [labelsizeToFit];
- //将label添加入自定义view
- [viewaddSubview:label];
- //将自动一定view显示在主view中!
- [scrollViewaddSubview:view];
- }
- @end
到这一步,这个简单的HelloWorld程序就写完了,我们发现以前我们用到的高级界面的类基本上Three20都写了新的方法去继承,实现更佳好的效果,将麻烦的地方由引擎自身帮我们完成。看一下效果图。我添加特殊的风格View
显示text 支持html语言 可以在程序中随意添加网页链接、

下面MOMO在贴一段官方提供的Demo中的一段代码,主要是用来设置View风格. 官方一共提供了19种view风格,代码中使用循环将这19中view 依次显示在界面中,绝对够我们开发IOS应用程序啦
哈哈~~所以说官方提供的DEMO 大家一定要好好阅读喔 哇咔咔~~
- -(void)loadView{
- UIScrollView*scrollView=[[[UIScrollViewalloc]initWithFrame:TTNavigationFrame()]autorelease];
- scrollView.autoresizesSubviews=YES;
- scrollView.autoresizingMask=UIViewAutoresizingFlexibleWidth|UIViewAutoresizingFlexibleHeight;
- scrollView.backgroundColor=RGBCOLOR(216,221,231);
- self.view=scrollView;
- UIColor*black=RGBCOLOR(158,163,172);
- UIColor*blue=RGBCOLOR(191,197,208);
- UIColor*darkBlue=RGBCOLOR(109,132,162);
- NSArray*styles=[NSArrayarrayWithObjects:
- //Rectangle
- [TTSolidFillStylestyleWithColor:[UIColorwhiteColor]next:
- [TTSolidBorderStylestyleWithColor:blackwidth:1next:nil]],
- //Roundedrectangle
- [TTShapeStylestyleWithShape:[TTRoundedRectangleShapeshapeWithRadius:10]next:
- [TTSolidFillStylestyleWithColor:[UIColorwhiteColor]next:
- [TTSolidBorderStylestyleWithColor:blackwidth:1next:nil]]],
- //Gradientborder
- [TTShapeStylestyleWithShape:[TTRoundedRectangleShapeshapeWithRadius:10]next:
- [TTSolidFillStylestyleWithColor:[UIColorwhiteColor]next:
- [TTLinearGradientBorderStylestyleWithColor1:RGBCOLOR(0,0,0)
- color2:RGBCOLOR(216,221,231)width:2next:nil]]],
- //Roundedleftarrow
- [TTShapeStylestyleWithShape:[TTRoundedLeftArrowShapeshapeWithRadius:5]next:
- [TTSolidFillStylestyleWithColor:[UIColorwhiteColor]next:
- [TTSolidBorderStylestyleWithColor:blackwidth:1next:nil]]],
- //Partiallyroundedrectangle
- [TTShapeStylestyleWithShape:
- [TTRoundedRectangleShapeshapeWithTopLeft:0topRight:0bottomRight:10bottomLeft:10]next:
- [TTSolidFillStylestyleWithColor:[UIColorwhiteColor]next:
- [TTSolidBorderStylestyleWithColor:blackwidth:1next:nil]]],
- //SpeechBubblewithpointerleftofthecentreonthetopedge
- //Locationsfortopedgeare45ontheleft,90inthecentre,134.999ontheright
- [TTShapeStylestyleWithShape:[TTSpeechBubbleShapeshapeWithRadius:5
- pointLocation:60
- pointAngle:90
- pointSize:CGSizeMake(20,10)]next:
- [TTSolidFillStylestyleWithColor:[UIColorwhiteColor]next:
- [TTSolidBorderStylestyleWithColor:blackwidth:1next:nil]]],
- //SpeechBubblewithpointerontheextremeleftonthebottomedge
- //Locationsforbottomedgeare225ontheleft,270inthecentre,314.999ontheleft
- [TTShapeStylestyleWithShape:[TTSpeechBubbleShapeshapeWithRadius:5
- pointLocation:314
- pointAngle:270
- pointSize:CGSizeMake(20,10)]next:
- [TTSolidFillStylestyleWithColor:[UIColorwhiteColor]next:
- [TTSolidBorderStylestyleWithColor:blackwidth:1next:nil]]],
- //SpeechBubblewithpointeronthebottomoftheleftedge
- //Locationsforleftedgeare315onthebottom,0inthecentre,44.999ontop
- [TTShapeStylestyleWithShape:[TTSpeechBubbleShapeshapeWithRadius:5
- pointLocation:315
- pointAngle:0
- pointSize:CGSizeMake(10,20)]next:
- [TTSolidFillStylestyleWithColor:[UIColorwhiteColor]next:
- [TTSolidBorderStylestyleWithColor:blackwidth:1next:nil]]],
- //SpeechBubblewithpointeronthecentreoftheleftedge
- //Locationsforleftedgeare315onthebottom,0inthecentre,44.999ontop
- [TTShapeStylestyleWithShape:[TTSpeechBubbleShapeshapeWithRadius:5pointLocation:0
- pointAngle:0
- pointSize:CGSizeMake(20,10)]next:
- [TTSolidFillStylestyleWithColor:[UIColorwhiteColor]next:
- [TTSolidBorderStylestyleWithColor:blackwidth:1next:nil]]],
- //SpeechBubblewithpointeronthebottomoftherighthandedge
- //Locationsforrightedgeare135ontop,180inthemiddle,314.999onthebottom
- [TTShapeStylestyleWithShape:[TTSpeechBubbleShapeshapeWithRadius:5pointLocation:224
- pointAngle:180
- pointSize:CGSizeMake(15,15)]next:
- [TTSolidFillStylestyleWithColor:[UIColorwhiteColor]next:
- [TTSolidBorderStylestyleWithColor:blackwidth:1next:nil]]],
- //Dropshadow
- [TTShapeStylestyleWithShape:[TTRoundedRectangleShapeshapeWithRadius:10]next:
- [TTShadowStylestyleWithColor:RGBACOLOR(0,0,0,0.5)blur:5offset:CGSizeMake(2,2)next:
- [TTInsetStylestyleWithInset:UIEdgeInsetsMake(0.25,0.25,0.25,0.25)next:
- [TTSolidFillStylestyleWithColor:[UIColorwhiteColor]next:
- [TTInsetStylestyleWithInset:UIEdgeInsetsMake(-0.25,-0.25,-0.25,-0.25)next:
- [TTSolidBorderStylestyleWithColor:blackwidth:1next:nil]]]]]],
- //Innershadow
- [TTShapeStylestyleWithShape:[TTRoundedRectangleShapeshapeWithRadius:10]next:
- [TTSolidFillStylestyleWithColor:[UIColorwhiteColor]next:
- [TTInnerShadowStylestyleWithColor:RGBACOLOR(0,0,0,0.5)blur:6offset:CGSizeMake(1,1)next:
- [TTSolidBorderStylestyleWithColor:blackwidth:1next:nil]]]],
- //Chiseledbutton
- [TTShapeStylestyleWithShape:[TTRoundedRectangleShapeshapeWithRadius:10]next:
- [TTShadowStylestyleWithColor:RGBACOLOR(255,255,255,0.9)blur:1offset:CGSizeMake(0,1)next:
- [TTLinearGradientFillStylestyleWithColor1:RGBCOLOR(255,255,255)
- color2:RGBCOLOR(216,221,231)next:
- [TTSolidBorderStylestyleWithColor:bluewidth:1next:nil]]]],
- //Embossedbutton
- [TTShapeStylestyleWithShape:[TTRoundedRectangleShapeshapeWithRadius:10]next:
- [TTLinearGradientFillStylestyleWithColor1:RGBCOLOR(255,255,255)
- color2:RGBCOLOR(216,221,231)next:
- [TTFourBorderStylestyleWithTop:blueright:blackbottom:blackleft:bluewidth:1next:nil]]],
- //Toolbarbutton
- [TTShapeStylestyleWithShape:[TTRoundedRectangleShapeshapeWithRadius:4.5]next:
- [TTShadowStylestyleWithColor:RGBCOLOR(255,255,255)blur:1offset:CGSizeMake(0,1)next:
- [TTReflectiveFillStylestyleWithColor:darkBluenext:
- [TTBevelBorderStylestyleWithHighlight:[darkBlueshadow]
- shadow:[darkBluemultiplyHue:1saturation:0.5value:0.5]
- width:1lightSource:270next:
- [TTInsetStylestyleWithInset:UIEdgeInsetsMake(0,-1,0,-1)next:
- [TTBevelBorderStylestyleWithHighlight:nilshadow:RGBACOLOR(0,0,0,0.15)
- width:1lightSource:270next:nil]]]]]],
- //Backbutton
- [TTShapeStylestyleWithShape:[TTRoundedLeftArrowShapeshapeWithRadius:4.5]next:
- [TTShadowStylestyleWithColor:RGBCOLOR(255,255,255)blur:1offset:CGSizeMake(0,1)next:
- [TTReflectiveFillStylestyleWithColor:darkBluenext:
- [TTBevelBorderStylestyleWithHighlight:[darkBlueshadow]
- shadow:[darkBluemultiplyHue:1saturation:0.5value:0.5]
- width:1lightSource:270next:
- [TTInsetStylestyleWithInset:UIEdgeInsetsMake(0,-1,0,-1)next:
- [TTBevelBorderStylestyleWithHighlight:nilshadow:RGBACOLOR(0,0,0,0.15)
- width:1lightSource:270next:nil]]]]]],
- //Badge
- [TTShapeStylestyleWithShape:[TTRoundedRectangleShapeshapeWithRadius:TT_ROUNDED]next:
- [TTInsetStylestyleWithInset:UIEdgeInsetsMake(1.5,1.5,1.5,1.5)next:
- [TTShadowStylestyleWithColor:RGBACOLOR(0,0,0,0.8)blur:3offset:CGSizeMake(0,5)next:
- [TTReflectiveFillStylestyleWithColor:[UIColorredColor]next:
- [TTInsetStylestyleWithInset:UIEdgeInsetsMake(-1.5,-1.5,-1.5,-1.5)next:
- [TTSolidBorderStylestyleWithColor:[UIColorwhiteColor]width:3next:nil]]]]]],
- //Mask
- [TTMaskStylestyleWithMask:TTIMAGE(@"bundle://mask.png")next:
- [TTLinearGradientFillStylestyleWithColor1:RGBCOLOR(0,180,231)
- color2:RGBCOLOR(0,0,255)next:nil]],
- //simplebottomonlyborder
- [TTShapeStylestyleWithShape:[TTRectangleShapeshape]next:
- [TTSolidFillStylestyleWithColor:RGBCOLOR(255,255,255)next:
- [TTFourBorderStylestyleWithTop:nilright:nilbottom:blackleft:nilwidth:5next:nil]]],
- nil];
- CGFloatpadding=10.0f;
- CGFloatviewWidth=scrollView.width/2-padding*2;
- CGFloatviewHeight=TT_ROW_HEIGHT;
- CGFloatx=padding;
- CGFloaty=padding;
- for(TTStyle*styleinstyles){
- if(x+viewWidth>=scrollView.width){
- x=padding;
- y+=viewHeight+padding;
- }
- CGRectframe=CGRectMake(x,y,viewWidth,viewHeight);
- TTView*view=[[[TTViewalloc]initWithFrame:frame]autorelease];
- view.backgroundColor=scrollView.backgroundColor;
- view.style=style;
- [scrollViewaddSubview:view];
- x+=frame.size.width+padding;
- }
- scrollView.contentSize=CGSizeMake(scrollView.width,y+viewHeight+padding);
- }
效果图


最后欢迎各位盆友可以和MOMO一起讨论Three20软件开发,这两天学Three20学的实在是太爽了~~如果你觉得看得不清楚,MOMO附带上本章的源码下载,希望大家可以一起学习
哈哈~。哇咔咔~ MOMO愿和 大家好好学习,大家一起进步哈~!!!
(下载后必需搭建three20环境成功后才能运行~
因为three20为引用加载,所以程序路径都是我本机的请见谅!)
分享到:


发表评论

相关推荐
雨松MOMO 程序开发 Three20软件引擎之构建开发环境与HelloWorld 欢迎大家下载阅读,哇咔咔~
雨松MOMO Three20软件开发系列博文 Three20软件引擎之结合第三方FMDB框架操作数据库详解 欢迎大家下载阅读,哇咔咔、
雨松MOMO程序开发系列博文,Three20软件引擎之TabBar与下拉列表访问数据与刷新, 欢迎大家下载阅读,哇咔咔。
雨松MOMO程序开发系列博文: Three20软件引擎之自定义TableView列表详解(二),欢迎大家下载阅读,哇咔咔!
雨松MOMO程序开发系列博文 Three20软件引擎之界面之间的转跳与参数的传递(三)欢迎下载阅读,哇咔咔!
FingerGestures研究院之...Three20研究院之构建开发环境与HelloWorld(一) Unity3D研究院之在开始学习拓展编辑器(一) Unity3D研究院之构建游戏框架与导出IOS项目(一) Unity3D视频开发教程之开始学习Unity(一)
雨松MOMO程序开发系列博文 Three20软件引擎之自制IOS顶部状态栏详解(六) 欢迎大家下载阅读,哇咔咔。
首先使用我们先用three.js创建一个立方体的hello world类型的案例。 <!doctype html> <html> <head> <meta charset="UTF-8"> <meta name="viewport" content="width=device-width, user-...
web3D构建,根据房间二维平面图构建了三维空间图,可实现房间开关门,移动,旋转,可各个角度观察房屋,使用了threejs库
4个threejs实战的项目-资料来源于网络-不喜勿喷
使用vite搭建three.js的开发环境,详细见文章:http://t.csdnimg.cn/08Ln9
helloworlda webVR 'hello world' project base in three.jsEnglish language version will soon be released.WebVR即web + VR的体验方式,我们可以戴着头显享受沉浸式的网页,新的API标准让我们可以使用js语言来...
适合正在基于threejs进行应用项目开发的工程师,完全开源基于threejs框架开发的前端代码
第1章 用Three.js创建你的第一个三维场景 1.1 使用Three.js的前提条件 1.2 获取源代码 1.3 创建HTML页面框架 1.4 渲染并展示三维对象 1.5 添加材质、灯光和阴影 1.6 用动画扩展你的首个场景 1.7 使用dat.GUI...
权威的three.js开发文档,完整版 本书通过大量的交互案例和示例代码介绍了Three.js提供的各种API,让读者不需要了解很难编程的WebGL的底层细节及复杂的着色语言,只需大致了解JavaScript及HTML,就能轻松地在浏览器...
使用three.js开发的3D机房项目
JS基于threejs开发的地球大屏可视化源码(动态)+项目说明.tarJS基于threejs开发的地球大屏可视化源码(动态)+项目说明.tarJS基于threejs开发的地球大屏可视化源码(动态)+项目说明.tarJS基于threejs开发的地球大屏可视...
22 Three.js优化之OffscreenCanvas与WebWorker 23 Three.js解决方案之加载.obj模型 24 Three.js解决方案之加载.gLTF模型 25 Three.js解决方案之添加背景和天空盒 26 Three.js解决方案之透明度bug 27 Three.js解决...
主要为大家详细介绍了使用3D引擎threeJS实现星空粒子移动效果,具有一定的参考价值,感兴趣的小伙伴们可以参考一下